Re-surfacing a concrete drive

nomad97

Resident Geek
If you think I have been a little quiet of late there is a reason for it. At the beginning of November I decided it was time to do something about the rapidly deteriorating concrete laid down in my drive and carport. The concreting was never good but recently more old sand and cement was being brushed out the gate than the rubbish I was trying to sweep away. Trying to contract a labour force from the village to do the work was a waste of time, both due to the time of year (rice harvest) and the general disposition of the workers to avoid work at any cost. The only alternative, therefore, was to do it myself.

I am no spring chicken and the dreaded four score years and ten are only a year away. I knew I needed to take a measured approach as to how I was going to achieve the resurfacing of the drive and carport all by myself, single-handed. The task was to relay the concrete surface, fill-in all the pot-holes and cracks and correct the levels for the efficient drainage of water. Whatever method I chose had to balance carefully my limited physical and technical ability against the requirement to do a good job. All together, there was some 95 to 100 square meters of concrete to be resurfaced. I decided this could be achieved by laying 1 meter square concrete slabs, laid in-situ. Initially I started at 1 square meter a day to get my 'body' going and after a few weeks I had upped the rate to 3 square meters each day.

I ordered the raw materials, cement, sand and gravel and made a concrete 'float' from an old teak plank that was laying around. I decided to use Durawood to make the boundaries of the square and also give me a frame to ensure the levels were spot-on. I also decided to use steel reinforcement mesh to give strength to the concrete squares. Average depth of the squares between 40 to 70 mm thick. Game on - let work commence. The drive and carport as at 6 weeks ago:

20161106_165808.jpg

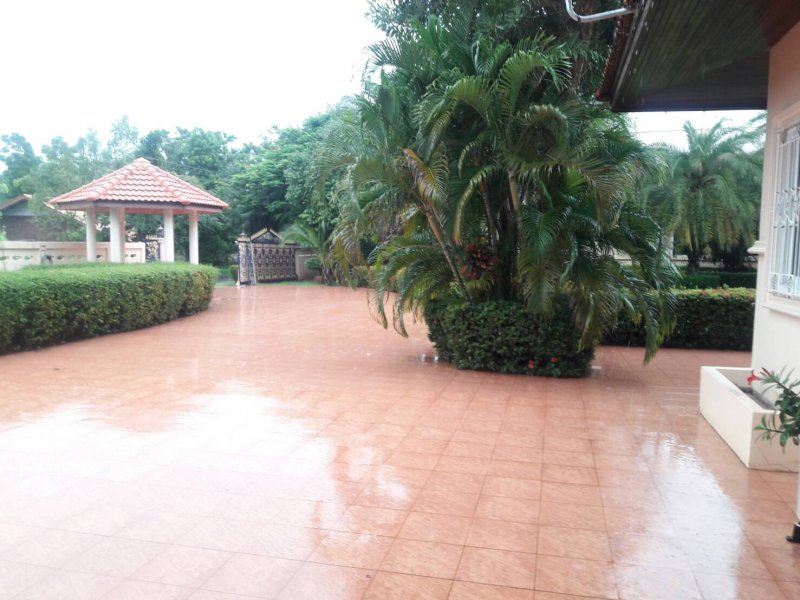
The drive and carport as it is today:

20161215_151201.jpg

I am beginning now to finish off the entrance. The car is parked in the road and it will be another week before I can drive into the carport again. All the work should be completed by the end of the year. By then, I guess I will have shifted 8 metric cubes of sand and gravel, together with another couple of metric cubes of cement. It's been very good exercise for me and, even though I say it myself, I am very pleased with the finished product.
 
THat looks really good Nomad. Well done!

On the subject of drives, mine's concrete too, and is starting to deteriorate less than 3 years after it was laid by the house builders. A place we rented for a year had a sandwash finish which was quite attractive. At the point where the driveway hit the road, the slope meant that the installers had a very thing layer of the sandwash over a concrete base, and a crumbling joint as a result.

Has anyone had this done here, and if so would you recommend the people who did it?

The alternative is to lay tiles with a non-slip finish, though the area to be covered is fairly large and the cost would be quite a bit higher I suppose.
 

Attachments

  • 1467890123459.jpg
    1467890123459.jpg
    177.3 KB · Views: 38
Like that.. My 2 Thai homes have had all concrete covered in terracotta tiles for 15 years.
 
Surin, looks lovely (seriously does).

Does it get slick (slippery) or not when it rains ?
 
A tiled surface does look very attractive to the eye. However, all tiled surfaces get very slippery when wet - even the non-slip tiles are not as non-slip as you may have thought. This is why I have gone for a rippled (brushed), concrete finish - its about as non-slip as you can get. Safety in the wet was my priority, especially given the number of wet days we get each year in Thailand.
 
THat looks really good Nomad. Well done!

On the subject of drives, mine's concrete too, and is starting to deteriorate less than 3 years after it was laid by the house builders. A place we rented for a year had a sandwash finish which was quite attractive. At the point where the driveway hit the road, the slope meant that the installers had a very thing layer of the sandwash over a concrete base, and a crumbling joint as a result.

Has anyone had this done here, and if so would you recommend the people who did it?

The alternative is to lay tiles with a non-slip finish, though the area to be covered is fairly large and the cost would be quite a bit higher I suppose.

I did that at my previous house and was well pleased with the final product. It is very messy to lay although the final job can look very good to the eye. Unfortunately, I no longer have the phone number of the guys who did it. However, it is not as cheap as you may think and the cost to lay a sand wash finish will be very similar to tiling. The last price I had was 300 baht/sq meter but that was 5 years ago. Good, attractive non-slip tiles are available at less than 200 baht/sq meter and a good tiler can be found for less than 100 baht/sq meter. The sand (500 baht/cube) and cement (120 baht/bag) will be an additional cost, as will the grouting between the tiles. Alternatively, you can negotiate an inclusive price for the tiler to provide his own sand/cement and grout. My last price for that, 5 years ago, was 300 baht/sq meter.
 
A tiled surface does look very attractive to the eye. However, all tiled surfaces get very slippery when wet - even the non-slip tiles are not as non-slip as you may have thought. This is why I have gone for a rippled (brushed), concrete finish - its about as non-slip as you can get. Safety in the wet was my priority, especially given the number of wet days we get each year in Thailand.
No one has ever slipped on mine..not a one! They aren't at all slippery and look a whole lot better than concrete.
 
I've just put Wan and Oliver on a flight back to check on the place..told her to knock up some slippery when wet signs.
 
I am not getting into any arguments with anyone. The purpose of my exercise was to resurface the drive. Quite honestly the existing surface was not suitable for tiling. The new concrete surface is or will be. As I said earlier, tiling is very pleasing on the eye. Maybe, just maybe, I will add non-slip tiling at a later date. Wait and see.
 
I am not getting into any arguments with anyone. The purpose of my exercise was to resurface the drive. Quite honestly the existing surface was not suitable for tiling. The new concrete surface is or will be. As I said earlier, tiling is very pleasing on the eye. Maybe, just maybe, I will add non-slip tiling at a later date. Wait and see.
Not sure if you can get epoxy pebblecrete in Thailand but, from experience, quicker than tiling and more resilient and, looks good as well.
 
Not sure if you can get epoxy pebblecrete in Thailand but, from experience, quicker than tiling and more resilient and, looks good as well.


Looks like pebblecrete is an Aussie thing. I am thinking of using a concrete sealant to finish off the work at the moment. Either gloss or non-gloss.
 
Looks like pebblecrete is an Aussie thing. I am thinking of using a concrete sealant to finish off the work at the moment. Either gloss or non-gloss.
If you use the sealant, sprinkle well sieved sand onto the base coat and when dry, apply a second coat over the sand, guaranteed non slip.
 
How much reinforcing mesh did you...or the previous builder use?
From the test holes I have pushed through the existing concrete I would say the original builder used very little, if any, rebar. I have used steel mesh (as shown below) throughout the re-surfacing work:

20161215_151001.jpg
 
Last edited:
Back
Top